 |
|
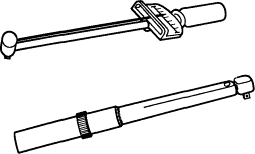
..:: SAAB FAQ :: 900 Old Generation :: Áåíòëè :: ×àñòü 1 ::..Torque Wrench A torque wrench is used to precisely tighten threaded fasteners to a predetermined value. Nearly all of the repair procedures in this manual include Saab-specified torque values in Newton-meters (Nm) and the equivalent values in footpounds (ft-lb). Several types of torque wrenches are widely available. They all do the same job, but offer different convenience features at different prices. Two typical torque wrenches are shown in Fig. 29. The most convenient ones have a built-in ratchet, and can be preset to indicate when a specific torque value has been reached. Follow the wrench manufacturer's directions for use to achieve the greatest accuracy.
Fig. 29.Torque wrenches Inexpensive beam-type (top) is adequate but must be read visually. Ratchet-type (bottom) can be preset to indicate when torque value has been reached A torque wrench with a range up to about 250 Nm (185 ft-lb) has adequate capacity for most of the repairs covered in this manual. For recommended torque values of 10 Nm or below, the English system equivalent is given in inch-pounds (in-lb). These small values may be most easily reached using a torque wrench calibrated in inch-pounds. To convert footpounds to inch-pounds, multiply by 12. To convert inch-pounds to foot-pounds, divide by 12. Feeler Gauges Feeler gauges are thin metal strips of precise thickness, used to measure small clearances. They are normally available as a set, covering arange of sizes. For Saabs, metric feeler gauges (in millimeters) are the best choice. Fig. 30 shows a set of feeler gauges.
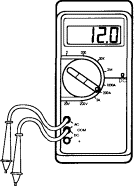
Fig. 30. Feeler gauge set, used for precise measurement of clearances between parts Volt-Ohm Meter(VOM) or Multimeter Many of the electrical tests in this manual call for the measurement of resistance (ohms) or voltage values. For safe and accurate tests of ignition, fuel injection, and emission control systems, the multimeter, shownin Fig. 31, should be digital, with high (at least 10,000 ohms) input impedance. Some meters have automotive functions such as dwell and pulse width that are useful for troubleshooting ignition and fuel injection problems.
Fig. 31. Multimeter with test probes CAUTION Ignition, fuel injection, emission controls and other electronic systems may be damaged by the high current draw of a test light with a normal incandescent bulb. As a general rule, use a high impedance digital multimeter or an LED test light for all electrical testing Saab SpecialTools Some of the more challenging repairs covered in this manual call for the use of Saab special tools. This, however, does not automatically mean that the job is too complicated or out of reach of the novice. Many of the Saab special tools mentioned in this manual are inexpensive and are simply the best thing to use to do the job correctly. In these cases, the tool is identified with a Saab part number. See your authorized Saab dealer parts department for information on how to order special tools. There are some jobs for which expensive special tools are essential, and not a cost-effective purchase for one-time repair by the do-it-yourself owner. This manual includes such repairs for the benefit of those with the necessary experience and access to tools. For the do-it-yourselfer, the need for special tools is noted in the text, and whether or not Saab dealer service is recommended. EMERGENCIES Changing a Tire If a tire goes flat while driving, pull well off the road. Changing a tire on a busy street or highway is very dangerous. If necessary, drive a short distance on the flat tire to get to a safe place. It is much better to ruin a tire or rim than to risk being hit. Stop the car on as flat a surface as possible, in a place where you can be easily seen by other drivers. Avoid stopping just over the crest of a hill. Turn on the emergency flashers, and set out flares or emergency markers well behind the car. Passengers should get out of the car and stand well away from the road.Take the jack, tools, and spare wheel from the trunk. Chock the wheel diagonally opposite to the one being changed. Loosen the wheel bolts while the car is on the ground, but leave them a little snug. Place the jack under in the lifting point nearest the wheel being changed (lifting points are shown above in Fig. 15). Use a board to provide a firm footing for the jack if the ground is soft. Raise the car only far enough so that the wheel is off the ground, and then remove the wheel bolts and the wheel. Remove the lug bolts or nuts and remove the tire. Install the spare wheel. Install the wheel bolts or nuts and tighten them by hand, then lower the car. With all wheels on the ground, fully tighten the bolts in a cross-wise pattern. Torque the wheel bolts when installing the wheel.
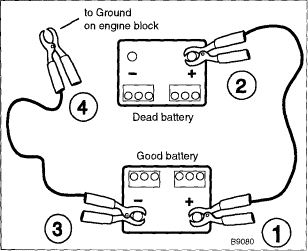
If torquing the wheel fasteners is not possible, tighten them as much as possible, then loosen and retorque the bolts to the proper specification at the earliest opportunity. Check the inflation pressure of the spare tire. Car Will Not Start If the engine turns over slowly or not at all, especially on cold mornings, the battery may not be sufficiently charged. Jump-starting the battery from another car may help. Jump-starting is described below. NOTE Be sure to read the cautions under Jump Starting prior to jump starting a low battery. Failure to follow the cautions may result in damage to the electronic components in the car. Push starting (or tow starting) a car with an insufficiently charged battery is another option. To push start the car, turn on the ignition, put the car in second or third gear and push in the clutchpedal. Push or tow the car. When the car is moving at a fair speed (10 to 15mph), release the clutch pedal. After the engine has started, push the clutchpedal back in and allow the engine to idle. Rev the engine for a few minutes to help restore the charge to the battery. WARNING Use extreme caution when push starting a car. Be aware of other traffic. Use the emergency flashers NOTE On cars with automatic transmissions, the design of the transmission makes it impossible to start the engine by pushing the car If the engine is turning over at normal speed with the starter motor, the battery and starter are fine. Check to make sure that there is fuel in the tank. Don't rely on the fuel gauge, it may be faulty. Instead, remove the gas filler cap and rock the car. It there is gas in the tank, you should hear a sloshing sound at the filler neck. If so, turn the ignition on and listen for the sound of the fuel pump. It should run for a few seconds, then stop. If it doesn't, fuel may not be reaching the engine. The engine also may have difficulty starting because it has too much fuel, because the fuel system is vapor-locked on a hot day, or because the ignition system is wet on a very damp day. There will probably be a strong smell of gas if the engine has too much fuel (referred to as "flooded"). Try holding the accelerator pedal fully to the floor while starting. This electrically turns off the fuel injectors. If the engine stills does not start, wait for a few minutes and then try starting the engine again. If you suspect vapor-lock, raise the hood, let the engine cool, and then try to start the engine. On damp days, check the distributor cap and spark plug wires for condensation. If they are wet, remove and replace the wires one at a time and dry them off with a clean dry cloth, then remove the distributor cap and wipe it dry inside and out. Jump-Starting Cars with partially discharged or completely dead batteries can be jump-started using the good battery from another car. When jump-starting the engine, always heed the following warnings and cautions. WARNING • Battery acid (electrolyte)can cause severe bums, and will damage the car and clothing. If electrolyte is spilled, wash the surface with large quantities of water. If it gets into eyes, flush them with water for several minutes and call a doctor • Batteries produce explosive and noxious gasses. Keep sparks and flames away. Do not smoke near batteries • Do not jump-start the engine if you suspect that the battery is frozen. Trapped gas may explode. Allow the battery to thaw first • Do not quick-charge the battery (for boost starting) for longer than one minute, and do not exceed 15 volts at the battery with the boosting cables attached. Wait at least one minute before boosting the battery a second time To jump-start the engine, place the cars close together, but do not allow them to touch. Turn off the engine of the car with the good battery. Connect the jumper cables as shown in Fig. 32.
Fig. 32. Battery jumper cables connections. Numbers indicate correct sequence for cable attachment The battery is mounted in the front right corner of the engine compartment. Connect the end of one cable to the positive post of the good battery, and the other end of the same cable to the positive post of the dead battery. The positive post is marked with a plus (+) sign. Connect one end of the other cable to the negative (-) post of the good battery, and connect the other end of the same cable to the engine block of the car with the dead battery. Make the connection as far away from the battery as possible, as there may be sparks. Have a helper start the car with the good battery and race the engine slightly, then start the car with the dead battery. Leave the cars running and disconnect the cables in the reverse order in which they were installed. The car with the dead battery will need to run for about a 1/2 hour to recharge the battery. Overheating If the coolant temperature is too high, find a safe place to stop and turn the engine off. Open the hood and allow the engine to cool until the temperature gauge needle is at the lower third of the scale. Continuing to drive an overheated car can cause expensive engine damage. WARNING Do not remove the coolant reservoir or radiator cap with the engine hot. Undoing either could spray hot coolant, and cause bums, or damage the engine. NOTE If the engine can not be safely turned off, make sure the air conditioner is off and turn the heater to high. This will help cool the engine until a safe stopping place can be reached Overheating may be caused by low coolant level or a damaged V-belt. Visually check the coolant level and V-belts as described in 110 Maintenance Program. If coolant is lost, check the filler cap, hoses, clamps and radiator for signs of leakage. Check for leaks at the water pump on the rear of the engine. If no leaks are found, add coolant after the engine has cooled. The car can be driven, but have the cooling system thoroughly checked as soon as possible. If replacement coolant is not available, then plain water can be used, but the coolant should later be drained and refilled with the proper mixture of anti-freeze and water. CAUTION Do not add cold water or coolant to a hot engine. Severe engine damage could result from the sudden temperature change If steam is coming from the engine compartment then there is most likely a burst coolant hose or a large leak in the cooling system. To find the leak, look for signs of coolant leakage on hoses, at hose connections, or on the radiator. Let the engine cool thoroughly, then add coolant or water to fill the system and start the engine. If a great deal of water or coolant flows out of the hole,then the car should not be driven until repairs are made. If there is a slight see page, then it may be possible to drive a short distance, adding coolant as needed. Oil Pressure Warning Light If the oil pressure warning light does not go out immediately after the engine starts, or if it comes on while driving the car, stop the engine immediately to prevent severe engine damage. Check the oil level as described in 110 Maintenance Program. If the level is low, add oil to the correct level and start the engine. If the light is still on, do not run the car at all. Have it towed. Brake Fluid Level Warning Light The red brake fluid level warning light is an indicator of brake fluid loss. Problems with the brake system should be checked and repaired immediately. See 5 BRAKES for more information. Towing The cars covered by this manual should be towed with a tow truck using wheel lift or flat bed equipment. Do not tow the car on all four wheels except for very short distances to move it to a safe place. If flat-towing the car, use the towing eyes at the front of the car under the bumper. Set the transmission in neutral. When towing the car from the rear with the front wheels on the ground, a maximum distance of 30miles is acceptable. If the car needs to be towed further, have the front wheels placed on dollies. NOTE Do not tow with sling-type equipment. The front spoilers and the bumpers may sustain damage Anti-Lock Brake System Warning Indicator If the anti-lock brake system warning indicator comes on at normal driving speeds, the anti-lock braking system is out of service. Under normal conditions, there will be no change in the effectiveness of the brakes. In an emergency situation, however, the normal anti-lock function is lost and the brakes could lock. Check the system as described in 5 BRAKES. Towing a Saab with an automatic transmission with the front wheels on the ground can result in transmission damage due to lack of lubrication. Always tow the car with the transmission lever in "N" (neutral) and the key in position "1" Saab recommends that cars with automatic transmission be towed with the rear wheels on the ground for no more than 30miles (50 km), at no more than 25 mph (40 km/h). Be sure the transmission fluid has been topped off before starting the tow Dim Lights Headlights that are dim or gradually getting dimmer generally indicate a problem with the battery or charging system. The battery charge indicator light may come on as the lights are dimming. In either case, the engine and accessories are running off of the battery alone, and will soon discharge it altogether. If possible, do not stop the engine unless you have the capability to jump start it. There may notbe enough power in the starting system to restart the engine. Instead, turn off as many electrical consumers as possible. This will reduce the current drain and will allow the car to be driven farther before you lose all battery power. With the engine and ignition off, check to see if the battery cables are firmly attached, or if there are any loose wires leading to the battery or to the alternator. Lookfor heavily corroded (covered by fluffy white deposits) wires and connectors Disconnecting, cleaning, and reinstalling corroded wires and connectors may solve the problem. Also check V-belt tension as described in 110 Maintenance Program. Spare Parts Kit Carrying a basic set of spare parts can prevent a minor breakdown from turning into a major annoyance. Many of the following items won't allow you to do major repairwork on the car, but they will help in the event of the failure of something that can disable the car or compromise its safety. Spare Parts Kit -Basic Contents: • V-belts for the alternator and water pump • one or two quarts of engine oil • a gallon container of engine coolant (premixed 50/50 anti-freeze and water) • spare fuel pump relay, also spare main relay • a new, unopened bottle of brake fluid (DOT 4 specifications) • 10 amp, 15 amp, and 20 amp fuses • upper and lower radiator hoses Spare Parts Kit -Additional Contents • replacement headlight (sealed beam or bulb) • brake light, turn signal light, and tail light bulbs • wiper blades • distributor cap and rotor |
| SAABNET.RU | Ôîðóì SAABNET.RU |
|
|


